| |
Creating user accounts is easiest with a tool called linuxconf. With linuxconf you can easily create and change user settings, as well as the settings for your network and the daily functioning of your server. We’ll use linuxconf to set up your necessary user accounts. To launch linuxconf type its name at your prompt, and you’ll see something like Figure 6. While not the prettiest program ever, linuxconf wields great power and functionality. Using the arrow keys, select “User Accounts” and hit enter. Here you will see a list of current accounts for system functions. By hitting the tab button twice, select “Add” and hit enter to begin creating your first user.
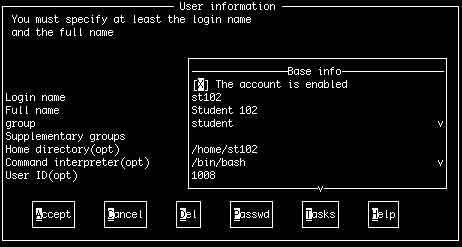
The way I designed my computer classroom calls for one user per machine, and no more. Therefore, since all of my machines are bar coded, I use the last three numbers of the code, combined with an abbreviated “student”: st102. This way, each machine allows one student user per session. Note that each student will not have to use a specific computer to log in, but making students log into the machine with the correct user I.D. (st102 will log into machine 102) cuts down on confusion and tightens security. Also, login names should not exceed eight letters, or it confuses the system. The figure below shows st102 being created in linuxconf. Once you have entered the login name and the full name, use the group “student” for all of the accounts that you create. Let the computer do the rest by tabbing once and hitting “Accept.” Next, the machine will prompt you for a password. Make sure you record the user name and the password as you continue. You just created user “st102.” Repeat this process for each of your machines, or for however many users you want logged into your classroom’s machines at any given time. Once you create the user accounts, exit out of linuxconf and we’ll set up the Network Information Service.
|
|